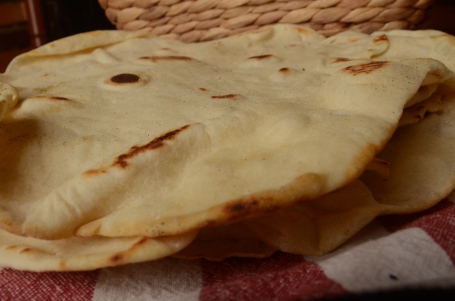
homemade wraps/tortillas

Image

I first made this recipe when my eldest child was a baby.  I was planing on making burritos for dinner but discovered I didn’t have any tortillas, logically one might pop off to shops for the required ingredient, but one problem, my baby was asleep and as any parent knows one of the golden rules with a baby is don’t wake a sleeping baby.  Also even if I did wake him up I would have to load him in the car, drive to the supermarket, fight for a carpark at the supermarket, get him out the car, hope he didn’t cry or vomit in the supermarket, then load him back in the car and go home.  All for a packet of tortillas.  So I busted out this recipe and they worked really well.  

I’ve made them many many times since because I like the fact I know whats in them, and because my family loves them and asks for them often.

They’re also so good when you need to stretch the budget, not only are they cheap to make, but can be used to stretch leftovers.  Got some casserole left over that’s not quite enough for a meal?  Wrap it up in one of these wraps, they are really filling so you make a smaller serving of casserole etc stretch.  They also work well as a substitute for nann bread to.

The only thing I find with them as they are a bit hard to roll out andIi can never get them as thin as shop bought ones, but that’s ok, it just makes them more filling.


Tortillas/wraps recipe adapted from Destitute Gourmet by Sophie Gray

2 /12 cups of four

1 tsp baking powder

1 tsp salt

3 tbls oil

about 1 cup of warm water


Combine flour, baking powder and salt in a  bowl of mixer. add oil and mix using a dough hook.  Gradually add enough water to form a soft dough.  Kneed in mixer for a bout 2 minutes rf by hand on floured surface for about 5 mins.  

Allow the dough to rest I’ve left it between 5 mins and 1/2 and hour and its been fine. 

Divide dough into about 8 pieces, less if you want large tortillas more if you want smaller tortillas, and roll out, try to get them pretty thin and may about 20 cms across.  Its not the easiest dough tot roll out so you may not get it in a perfect circle shape that’s ok.

Spray a hot pan with oil and cook them for about 30-60 secs until they bubble and get brown spots on them, turn over and cook other side.  repeat with remaining tortillas, re oiling pan in between each one.  

If not eating straight away cover with lightly damp clean tea towel.
cookbooks and blogs of the moment

DSC_0429

Anyone who’s been to my house knows I may have a slight problem with cookbooks.  Some may I have too many, to them I say pfft as if that’s possible.  

I thought I’d share a few I’m particularly enamored with right now, as well as a couple of blogs that I seem to be hitting up for recipes and ideas.

No surprise there’s a bit of a baking focus

Baking – from my house to yours by Dorrie Greenspan

The best way to describe this book is its baking porn, hundreds of baking recipes, she’s got, cakes, cookies, pies deserts and even breakfast sweets covered.  Beautiful photographs and recipes written in a really easy to follow way from a lady who worked on cookbooks with Julia Child.  Everything I’ve made from this book has worked perfectly.

Women’s Weekly Baking Day
Who doesn’t own a Women’s Weekly cooking book? This one has a bit of a focus on retro baking recipes and some more modern classics and has a very cute cover.  Cute pics and most importantly easy to follow recipes that work.

The Blue Ribbon Cookbook  -by Liz Harfull

A lovely collection on recipes that have won blue ribbons at South Australian country shows.  The recipes are as delightful as is reading about the history of various country shows and people behind the recipes.  Lovely historical and current photographs.

I’m also a bit addicted to reading cooking/food blogs. At the moment a couple of my go to blogs include

Bakeaholic Mama
Lovely blogger who posts always look delicious. Lots of baking recipes with a few savoury ones thrown in too. I’m just itching to try her cider yeast doughnuts.

Shutterbean
Some fantastic recipes often with some unusual flavour combinations, that at first you might question. 2 of our favourite pizza topping combos come from her site, bacon and brussel sprouts and corn, zucchini and lime pizza. Gorgeous photos of not only her recipes but of her life. Everything I’ve made form her site has worked.

What are some of your current cookbook or blog reads?

Homemade Bounty Bars

DSC_0163
You can make bounty bars and you’ll only need 3 ingredients.

Like me you’re thinking GET OUT OF HERE, WHY HASN’T THIS BEEN BROUGHT TO MY ATTENTION BEFORE!!!

So I’ve got a bit of a thing for coconut, coconut jam drops, coconut ice cream, lamingtons and now bounty bars.  

For a coconut lover like me I can’t fathom why I haven’t made them before.  As I said you only need 3 ingredients.  They’re so easy to make, the only cooking involved is melting chocolate and most of the time involved was the bars sitting in the freezer or fridge doing their thing .  Most importantly they were crazy delicious.

 Just a tip it’s important to test the coconut condensed milk mixture for quality control, however you’ll need self control while doing this otherwise you’ll devour the lot and have none to coat in chocolate.

Homemade Bounty Bars

3/4 Can Condensed milk

3 cups shredded coconut

450 g chocolate (I used 1/2 milk 1/2 dark because that ‘s what was in the cupboard, use what you prefer)

Put coconut into bowl, pour in condensed milk, mix thoroughly. 

Using wet hands shape into bar shapes and place on baking paper lined tray.  Put tray into freezer for a couple of hours to firm up.

Once the bars are firm, melt chocolate.  I usually do it in the microwave on high for 30 sec bursts stiring in between each burst. 

Working in batches take several of the bars out of the freezer (if you take them all out the ones you do last will have softened up) and coat in melted chocolate.  I find the best way is to roll them in chocolate with 2 forks and let any excess chocolate drip off.  Place on another baking a paper lined tray.

Repeat with remaining bars and either leave on bench or put in fridge to set chocolate, fridge is best if it’s warm to hot in your house plus they’ll be set quicker meaning you can enjoy them sooner 

Keep them stored in the fridge. I imagine these would last up to 4-5 days but they lasted just over a day in this house as they were so moreish.